
Latest firmware update for inXtron's CloudSync network attached storage drive with detailed instructions on how to update the firmware.
Supported products:
CY1-LN2U3OAA
| File | Description | File size | Last modified |
|---|---|---|---|
| Firmware version v2.10g inx1.3 | 565 kB | Dec 02, 2011 | |
| History of previous changes | 0.8 kB | Dec 02, 2011 |
Remarks
Existing torrent files in the BT download queue will be removed during the firmware upgrade. After the upgrade has been completed, the torrent files have to be added to the queue again.
Warning
- Never turn off your unit during the firmware update procedure. This may damage your device! If the upgrade fails (e.g. power supply failure during firmware update), you may not be able to operate your device anymore.
- This firmware is only for inXtron's standard products and specifically the model(s) as mentioned above. DO NOT use this firmware for any other devices!
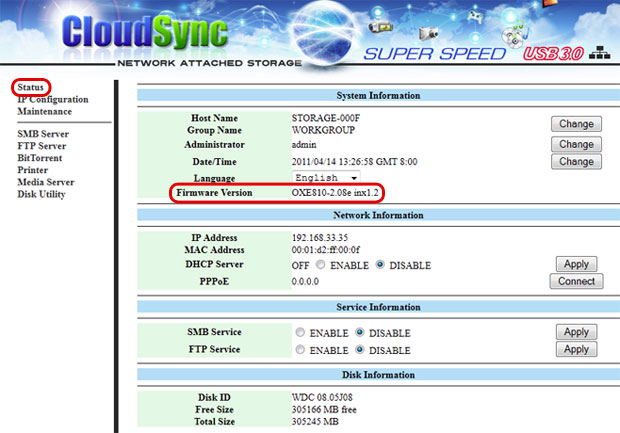
Where to find the current firmware version
- Start your network drive, open the web browser and login as administrator.
- Go to the Status menu. The current firmware will be shown in the System Information section under "Firmware Version".
- If your current version is the same as the latest release seen above, your unit does not need to be updated. If yours has an older version, follow the steps as described below to update the firmware.
How to update the firmware
- Download the latest firmware and save it on your local disk. Unzip the *.zip file to extract the *.bin file.
- Turn on your network drive, use the web browser and log in as administrator.
- Stop all current downloads and then go to "Firmware Update" in the "Maintenance" menu.
- Click Browse and locate the new firmware (*.bin file) on your computer.

- Click Update to start the firmware upgrade procedure.

- Click OK to confirm the pop-up dialog.
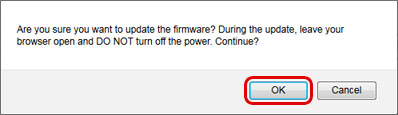
- Wait until the page is refreshed automatically and the pop-up dialog confirms the update has completed. This might take a couple of minutes, so make sure the device is not interrupted until the upgrade is finished!
- Click OK to confirm the pop-up dialog.
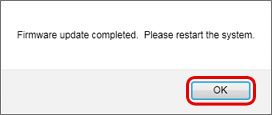
- Click Reboot to restart the system.

- Click OK to confirm the pop-up dialog.

- After a major firmware update, it is recommended to reset the device back to factory default.
- Done!